
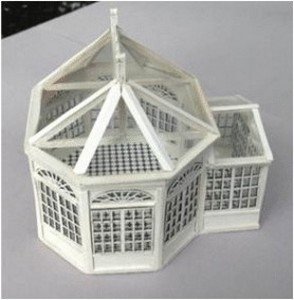


Conservatory room with corridor
Conervatory model kit 1/48th scale, with corridor. Suitable as stand alone construction, or as accessory to 1/48th scale house

- Shipping info
We deliver worldwide By Australia Post
- Payment methods
X-Payments ( Credit Card ) PayPal ( accepts credit card ) Square ( Credit card ) Bank Transfer
- Return Policy
Custom engraved products are made on your approval of proof emailed to you. at receipt of order
These cannot be returned
Conervatory model kit 1/48th scale, with corridor. Suitable as stand alone construction, or as accessory to 1/48th scale house
floor size at this scale is 94 x 87 mm ( 3.7 x 3.5 inches )
Wall height is 50 mm ( 2 inches ) Floor to top roof frame 75 mm ( 3 inches )
Kit
Walls
Windows/doors
Wooden components
Tiled floor
Paper caps
Card caps
Acetate window/door panes
Materials required
Thick Tacky glue
White gloss acrylic paint
(If you are going to spray you need to undercoat with a mat spray or paint first)
Tarzans Grip or similar plastic glue
Keep all pieces in the layout until needed and have containers handy to place pieces in once they are popped out.
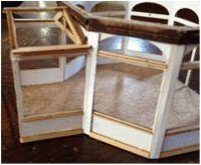
WALLS
- Remove the pieces of card walls carefully. Leave window and door spaces in place for the moment if they stay in. Definitely leave the door spaces in, even if you have to glue them in with minimal glue. Bend the walls on the score lines, using a ruler to assist so they don’t bend at the windows.
- Glue long wall around base, gluing corridor walls in at the same time so they fit well. The wall piece is exactly the distance around the base. Start at the front doors and check from the bottom that the corners match. Glue the back door frame between the corridor walls.
- Remove the gutter pieces (C2) using the tip of your craft knife to separate them. Keep sizes separate and sand carefully. Lay the thin pieces on the mat to avoid them breaking. NOTE: sand all pieces as you remove them.
- Glue larger gutter pieces in front of the top of the hexagonal wall, pushing them together as this will ensure the wall angles are correct and the roof will fit. Continue pushing ends together until there are no gaps.
- Glue flat gutter pieces under the larger ones, note the angle at the ends face inwards
TRIM
- Separate the card wall caps (J) and bend in half over a small ruler. It may help to run the tip of a blade along the score to deepen it. Glue these over all the hexagonal wall joins. Note that the corridor corner caps bend the opposite way and you will need to cut out a notch to fit around the roof piece.
- Trim each side as per photo - a 2 mm piece along the bottom and a 1mm piece under and over the window space between the paper caps.( E4,5,6)
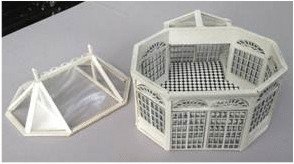
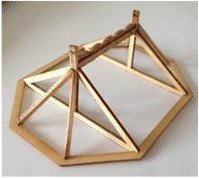
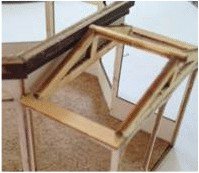
LARGE ROOF
- Pop out roof base hexagon ( E1) and sand.
- Glue roof trusses (H1) into corners.
- Glue 3 pieces of the fancy roof capping together (E2&3).
- Allow both to dry.
- Glue capping into slots and allow to dry.
Glue 4 roof beams in place squaring up the structure. You can check this by using the window panes (D) to check shapes are correct but do not get glue on them.
CORRIDOR ROOF
- Glue (E6) across the top of the corridor walls, flush with the inside and with the notch inserted in the slot on the wall.
- Glue one corridor roof truss across the back of the corridor flush against the gutter i.e. out from the wall.
- Glue second truss on top of the back door frame.
- Trim and glue the corridor roof beam (G2) in place between the trusses.
PAINT
- Paint the 2 sections with white gloss acrylic paint. If spraying (previous workshop participants have had great and not so great results with spraying) do many thin coats and undercoat with mat paint first. Try not to get too much paint in the door and window spaces.
WINDOWS
- Peel plastic off the black side of each window component.(Do this while pieces in the strip)
- Lay each on a piece of mouse pad or similar and press out the spaces with a stylus or tip of a craft knife. Be careful of the thin frames.
- Hold all doors/windows in your hand and sand off the burn marks on the white plastic.
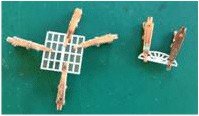
- Sort the windows, doors, fanlights and match with their corresponding window panes.
- Hold the 3 parts together with tiny pegs or clips as per photo.
- Using a toothpick run a VERY thin line of plastic glue around the edges between the pegs. Allow to dry.
- Sand the inside edges of the window/door spaces with a fine emery board to remove paint build up.
- Glue all in place with Thick Tacky.
ROOFS
- Fit acetate panes and glue in place with Tacky and allow to dry. Fit each piece first and keep your hands clean so as not to get glue on the plastic.
- Trim with paper caps (F1)
FINISH
- Glue tiled floor onto base.
Glue gold balintines on as door handles

A1Walls
A2 Back door frame
A3 Corridor walls
B1 Fanlights
B2 Windows
B3 Doors
C1 Base
C2 Gutters
D Window panes
E1 Roof base
E2 Capping
E3 Capping
E4 Doorway trim
E5 Side wall trim
E6 Corridor wall trim and top of corridor wall
F1 Paper roof caps
G1 Corridor roof trusses
G2 Corridor roof top beam
H1 Roof trusses
H2 Roof beams
J1 Corner caps

The Conservatory can be attached to the side of a house or made into a vignette as above using a brick wall and garden base.
Instructions prepared by Jan Stillard
We ship using Australia Post parcels
Regular and Express options are available for National delivery
and to your own Country
We accept the following payment methods:
PayPal ( accepts credit card ) Square ( Credit card ) Bank Transfer
Products are made to order
On placement of order confirmation is emailed to you
If you have any image to be used on product
Return email with image/s attached.
A layout proof is prepared and emailed to you as pdf file.
Once final layout is approved, then this is what is made.
Product received in good condition as per proof is NOT returnable
If you do have issue with quality of your receipt, then send photo and reasons
In approved cases a replacement product will be made